
Idealpos is able to print receipts that are used specifically in the Dry Cleaning business.
Generally, when using Dry Cleaning, you will require special ink and paper to ensure that when the clothing is being cleaned, that the paper doesn’t disintegrate or the ink run.
When items are added to the POS to be cleaned, for each item that is entered, a small tab will be printed that gets attached to the clothing and it will contain details of the receipt that has been saved and given to the Customer.
This will later help to keep all garments together and make them easy to find.
When Dry Cleaning features are activated, you are able to specify how many tags are printed for a single item.
An example of this might be a “3 Piece Suit.”
Although it is one item, there are three physical items that will be cleaned and each will need a tag.
You set the amount of tags for each item directly on the Stock Item.
Once the Dry Cleaning features have been activated, special configuration settings need to be performed for it to work properly.
Go to Setup > Yes/No Options.
Tick the option “Dry Cleaning Features” to turn the functionality on.
You must not select the option ‘Accumulate Items on Receipt’.
If this option is selected it will not print receipts or dates correctly.

You need to select “Print Text on Bills/Receipt”.
If this option is not selected it will not print receipts or dates correctly.

Tick the option “Dry Cleaning Tabs print on Second Receipt Printer”.
It is possible to use a Dot Matrix printer for the Dry Cleaning Tabs, and a Thermal printer for the customer receipt.

Each Stock Item that is able to be cleaned needs to be set to use a set amount of tags.
Some items may be charged as a single item, but requires more than one tag.
Suits, pairs of items and sets all fall into this category.
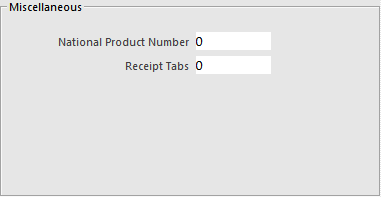
Go to File > Stock Control > Stock Items > Add/Modify > Advanced > Miscellaneous > Receipt Tabs.
Enter the total amount of Tabs required for the item.
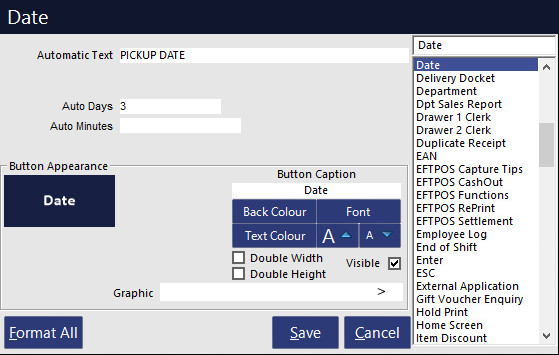
A button will need to be created so that you can enter the Pickup Date for the items.
Go to Setup > POS Screen > Layouts > Buttons.
You have the option to select Auto Days or Auto Minutes.
If you have a default cleaning time of 3 days, enter 3 in the day field.
This will automatically set the pickup day 3 days from when the customer brought the goods in.
In the Automatic Text field, enter “PICKUP DATE” in capital letters.
As most Dry Cleaning businesses don’t expect payment until the goods have been cleaned and the customer returns to pick them up, it may be a good idea to create a Customer button, to set up and use Accounts.
